Apache想必大家都不会觉得陌生吧,因为他现在已经成为了一款主流的HTTP服务器之一,由于它具有快速、可靠且完全免费、开源等有点,受到我们很多网站程序员和站长们的青睐。下文就为大家介绍一下Apache是如何安装和配置的,希望对大家有帮助。

软件简介:
Apache是最流行的HTTP服务器软件之一,快速、可靠、可通过简单的API扩展,Perl/Python解释器可被编译到服务器中,完全免费,完全源代码开放,如果你需要创建一个每天有数百万人访问的Web服务器,Apache可能是最佳选择。
一、apache的图形化安装方法:
1、在网上去下载Apache,下载地址:http://soft.huweishen.com/soft/269.html。
2、下载完成后解压文件到任意位置,双击文件,即可开始如下图所示的安装操作。
图一:安装向导启动
图二:填写相关信息
“Network Domain”填写你的网络域名,如果没有网络域名,可以随便填写。但如果你架设的 Apache 服务器如果要放入Internet ,则一定要填写正确的网络域名。
在“Server Name”下填入你的服务器名,也就是主机名。
“Administrator's Email Address”填写系统管理员的联系电子邮件地址
下面有两个单选按钮需要选择安装软件的方式,第一个是为系统所有用户安装,使用默认的80端口,并作为系统服务自动启动;另外一个是仅为当前用户安装,使用端口8080,手动启动。一般情况下我们选择第一个“for All Users, on Port 80, as a Service – Recommended”。
图三:选择安装方式
图四:选择安装位置
图五:安装进度显示
图六:安装完成
3、测试apache是否正确安装:安装完成后之后在系统托盘图标中会自动添加Apache的图盘图标 ,有点单击选择‘Start’即可启动服务。再打开浏览器在地址栏中输入http://127.0.0.1,如果你使用的是8080端口的话,就在浏览器中访问http://127.0.0.1:8080如果出现“It works!”,则说明Apache已成功安装,如下图所示:
图七:安装成功
4、修改Apache配置文件【apacheconfhttpd.conf】:
1)修改Apache网页存放默认路径:如果我们使用Apache作为我们的HTTP服务器的话,所有的网页文件都会保存在Apache配置文件指定的路径中,一般为了管理方便,我们可以在配置文件里面讲网页存放路径自行修改。找到apache的配置文件找到【DocumentRoot】,将它后面的路径修改就可以了。
图八:设置网页默认存放路径
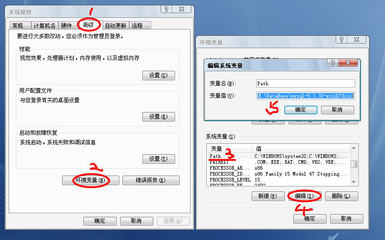
2)启用Apache的php支持功能:为了能使Apache在启动后就能载入PHP模块,我们就需要在Apache的配置文件中添加php的Apache模块。在配置文件中查找【LoadModule】,在它的最后一行添加语句:“LoadModule php5_module "d:/webdev/server/php5/php5apache2_2.dll"”,其中的“d:/webdev/server/php5”也就本机的PHP的安装路径。
图九:添加php的apache模块
3)添加.php支持:为了使Apache作为HTTP服务器的PHP网站能正常打开,我们一般会在配置文件中做一些配置。查找【AddType application/x-gzip .gz .tgz】然后另起一行添加“AddType application/x-httpd-php .php”语句。
图十:添加.php后缀支持
4)添加默认php文档:就是如果我们只输入域名访问的话,默认打开的页面是什么页面。查找【DirectoryIndex index.html】,可将这句替换成你的默认php文件名如:DirectoryIndex index.html index.htm index.php default.php。
图十一:添加默认php文件
5、重启Apache服务器,到此您的Apache服务器就已经安装配置完成了,下面就可以安心的编写你的网站了。
二、Apache命令编译安装方法
PS:本实验工具采用的是Apache2.4X的版本,由于apache-2.2与新出的apache-2.4安装不同的地方在于,2.4版的已经不自带apr库,所以在安装apache-2.4之前,需要下载apr。
1、下载软件:
cd /tmp (软件的下载路径)
wget http://mirrors.axint.net/apache//httpd/httpd-2.4.2.tar.gz
wget http://mirrors.axint.net/apache//apr/apr-1.4.6.tar.gz
wget http://mirrors.axint.net/apache//apr/apr-util-1.4.1.tar.gz
tar xzf httpd-2.4.2.tar.gz
tar xzf apr-1.4.6.tar.gz
tar xzf apr-util-1.4.1.tar.gz
2、移动apr到srclib:
mv apr-1.4.6 httpd-2.4.2/srclib/apr
mv apr-util-1.4.1 httpd-2.4.2/srclib/apr-util
3、安装apache-2.4:
cd /tmp/httpd-2.4.2
./configure --prefix=/usr/local/apache --enable-so --enable-deflate=shared --enable-ssl=shared --enable-expires=shared --enable-headers=shared --enable-rewrite=shared --enable-static-support --with-included-apr --with-mpm=prefork
make && make install
cp -f build/rpm/httpd.init /etc/init.d/httpd
chmod +x /etc/init.d/httpd
chkconfig --add httpd
chkconfig httpd on
cd /etc
mv httpd httpd_old
ln -s /usr/local/apache/ httpd
cd /usr/sbin/
ln -fs /usr/local/apache/bin/httpd
ln -fs /usr/local/apache/bin/apachectl
cd /var/log
rm -rf httpd/
ln -s /usr/local/apache/logs httpd
至此Apache的两种安装方法已经介绍完了,其实Apache的安装挺简单的,只要您细心的按照以上安装步骤操作的话,一定可以成功的,如果在安装过程中还有其他疑问的话欢迎留言。
Apache系列软件下载地址:
Apache HTTP Server 2.0.64 For Windows:http://soft.huweishen.com/soft/46.html。
Apache HTTP Server 2.2.19 For Windows:http://soft.huweishen.com/soft/45.html
Apache HTTP Server 2.2.19 For Linux:http://soft.huweishen.com/soft/49.html
Apache HTTP Server 2.0.64 For Linux:http://soft.huweishen.com/soft/50.html
Apache HTTP Server 2.2.22 For Windows:http://soft.huweishen.com/soft/269.html
Apache HTTP Server 2.2.12 For Linux:http://soft.huweishen.com/soft/270.html。