DELL InspironOne_2020 这个型号的一体机配置跟InspironOne_2320 的配置比对
Product Overview | ||
Features | Dell Inspiron™One 2020 | Dell™Inspiron™ One2320 |
Touch-screen | No | Yes |
Processors | Intel®Core™ i3 | Intel® Core™ i3 |
Chipset | Intel®H61 Express | |
Memory | 1333 MHz DDR3 SODIMM | |
Memory min/max | 2 GB - 6 GB | 2 GB - 8 GB |
Video | UMA: Intel®HD / HD 2000 Graphics | UMA: Intel® HD / HD 2000 / HD 3000 Graphics |
Network | RealTek®10/100/1000 Mbps LOM | |
Audio | Realtek®ALC662VD HD Audio | Realtek® ALC269 HD Audio |
Card Reader | 8-in-1 Media Card Reader | |
LCD | 20.2 inches HD+ WLED (1600× 900) | 23” FHD WLED (1920 x 1080) |
Hard Drive | 3.5-inch SATA III HDD 500GB / 1TB (7200RPM) | 3.5-inch SATA II HDD 320GB / 500GB / 1TB / 1.5TB/ 2TB (7200 RPM) |
Optical Drive | Blu-ray Disk™rewritable | DVD+/-RW |
TV Tuner | A339A - US, A33TD - Japan. | A360-Japan, A339D-EMEA, APCC and Taiwan, A328-CCCand CHINA, A339A-US and Korea. |
Wireless | 802.11 a/b/g/n + Bluetooth 4.0(optional) | 802.11 a/b/g/n + Bluetooth 3.0 (optional) |
Camera | 720p HD (1280 ×720) + Digital Microphone | 1 Mega Pixel + Digital Microphone |
Speakers | 2 × 3Watt speakers | 2 × 4 Watt speakers |
Internal IR Receiver | Yes | |
Ports and Connectors | 1 ×Microphone Port | 1 × VGA port |
AC Adapter | 130W | 180 W - PDC, i3, i5 and i7 with Discrete video orIntel® Turbo Boost Technology |
Operating System | Windows 7 Home Basic 64-bit | Windows 7 Home Basic 64-bit |
Dimensions | Height: 12.7 inches | Height: 16.93 inches |
1 | Camera activity indicator — Indicates if thecamera is on or off. A solid white light indicates camera activity.摄像头补光灯 |
2 | Camera — Used for video conferencing andcapturing video or still images. 摄像头 |
3 | Microphone — Provides high quality sound forvideo chatting and voice recording. 麦克风 |
4 | IR Reciever — Recieves singals from the remotecontrol. (Remote control ships only with systems ordered with TVTuner Card) 红外接口 |
背面。
1 | Air Vents — Dissipates heatgenerated by internal components. 散热口,出风口 |
2 | USB 2.0 connectors (3) — Connect to USBdevices, such as a mouse, keyboard, printer, external drive, or MP3player. USB接口 |
3 | TV-in connector (optional) — Connects to anexternal antenna to view programs using the optional TV tuner card.TV信号输入接口 |
4 | Network connector — Connects your computer to anetwork or a broadband device if you are using a wired network.RJ45网络接口 |
5 | AC adapter connector — Connects to the ACadapter to power the computer. 适配器接口 |
6 | Security cable slot — Attaches a commerciallyavailable security cable to the computer. 安全锁 |
左侧
1 | Volume button / Volume/Brightness increasebutton - Press this button first to get the volume up/downmenu and the same button is used to increase volume and brightness.音量 亮度调节 |
2 | Brightness button / Volume/Brightness decreasebutton - Press this button first to get the brightnessup/down menu and the same button is used to decrease volume andbrightness. |
3 | Volume/Brightness exit button - Press thisbutton to exit the volume or brightness menu. |
4 | Audio-out/Headphone connector - Connects to apair of headphones. 耳机接口 |
5 | Audio-in/Microphone connector - Connects to amicrophone or input signal for use with audio playback devices likeCD/MP3 player. 麦克风接口 |
6 | USB 2.0 connector - Connects to USB devices,such as a mouse, keyboard, printer, external drive, or MP3 player.USB2.接口 |
7 | USB 2.0 connector- Connects to USB devices,such as a mouse, keyboard, printer, external drive, or MP3 player.USB2.接口 |
8 | 8-in-1 Media Card Reader - Provides a fast andconvenient way to view and share digital photos, music, videos, anddocuments stored on memory cards. 读卡器接口 |
.
1 | Optical drive - Plays or records CDs, DVDs, andBlu-ray Discs (optional). 光驱 |
2 | Hard-drive activity light - Turns on when thecomputer reads or writes data. A blinking white light indicateshard drive activity. 硬盘指示灯 |
3 | Power button - Turns the computer on or off whenpressed. The light on the button indicates the following powerstates: |
接下来就是拆机过程了。螺丝刀的话建议你淘宝买拆机套装,好像是金鹿的工具还不错,第一个是 塑料撬棒
视频地址:http://pan.baidu.com/share/link?shareid=238419&uk=2433010129
先,拿掉外面的底座
箭头位置有个卡槽,用塑料撬棒插进去就可以翘起了。
去掉4颗螺丝就可以把底座拿下了
视频地址:http://pan.baidu.com/share/link?shareid=238423&uk=2433010129
拿掉底座之后,就要拿图示的盖子了,这个第一次拆有点点难,比较卡得紧
拿掉壳之后,想换硬盘 加内存就很方便了
视频地址:http://pan.baidu.com/share/link?shareid=238474&uk=2433010129
拆光驱,拔掉数据线 ,去掉螺丝
往外一拉就可以拿掉光驱了
视频地址:http://pan.baidu.com/share/link?shareid=238521&uk=2433010129
大多数人拆机基本上都是加内存和硬盘,还有除尘,那下面就看看怎么加内存。
内存在这个黄色框的盖子下面,去掉螺丝,一推,一拉就可以了
视频地址:http://pan.baidu.com/share/link?shareid=238554&uk=2433010129
接下来是拆 盖在主板上面的 那个盖子,去掉5颗螺丝
视频地址:http://pan.baidu.com/share/link?shareid=238558&uk=2433010129
接下来拆硬盘,去掉固定硬盘框的3颗螺丝
无线网卡,拔掉天线,去掉固定螺丝就可以了
接下来拆散热器,图示黄框位置
去掉螺丝,就可以拿掉了
之后的风扇,喇叭之类的动就很好拆了,就不一一说明了,接下来拆主板。
视频地址:http://pan.baidu.com/share/link?shareid=239735&uk=2433010129
拔掉主板上面的连接线
屏线
5颗螺丝
这样就可以拿掉主板了
接下来拆屏,之前拆掉主板之后,其他的小部件就很好拆了。现在要拆黄框这个,屏就是固定在这个上面的
视频地址:http://pan.baidu.com/share/link?shareid=239750&uk=2433010129
去掉图示的螺丝
去掉螺丝之后,把卡扣掰开,
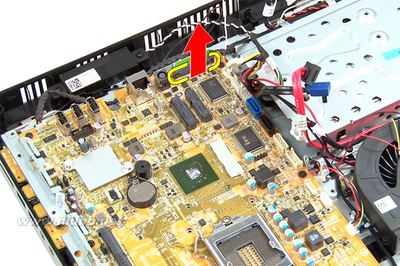
到这里就差不多了,最后附上其他有用的资料。。power led的图片其实是动态的,就是闪烁的,1-7都是一样的状态,但是报警声不一样
Power LED Status 指示灯状态 | Beep | Description | Failure Coverage |
1 | BIOS ROM checksum in progress or failure. BIOSChip | System board failure, covers BIOS corruption or ROMerror | |
2 | No RAM Detected | Memory failure | |
3 | Chipset Error (North and South Bridge Chipset,DMA/IMR/Timer Error for Intel platform); Chipset Error | System board Failure | |
Time-Of-Day Clock test failure. | |||
Gate A20 failure | |||
Super I/O chip failure | |||
Keyboard controller test failure. | |||
4 | RAM Read/Write failure | Memory failure | |
5 | RTC Power Fail | COMS battery failure | |
6 | Video BIOS Test Failure | Video card failure | |
7 | CPU Failure | CPU |
 爱华网
爱华网